

|
|||||||||||||||||||||||||||||||||||||||||||||||||||||||||||||||||||||||||||||||||||||||||||||||||||||||||||||||||||||||||||||||||||||||||||||||||||||||||||||||||||||||||||||||||||||||||||||||||||||
Flute Crafting DimensionsThis page provides many dimensions for crafting flutes in general and Native American flutes in particular. The information has been assembled from many sources, and I have tried to cite those sources wherever possible. In general, length refers to a dimension taken along the longitudinal (long, or “North-South”) axis of the instrument. Width is generally taken perpendicular to that longitudinal axis, sometimes called the “East-West” direction. The diagrams on this page represent the configurations that I have seen most frequently on Native American flutes. There are many variations on the basic designs show, far more than can be captured by the limited number of dimensions on this page. Differences in construction techniques and artistic elements create a myriad of possibilities. These diagrams and the recommendations for various dimensions provide a starting point for flute crafters. Overall Dimensions
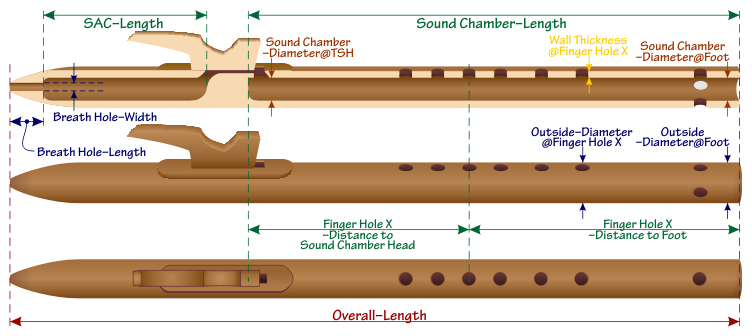
Overall–LengthThe total length of the instrument along it's long axis, including ornaments. Breath Hole–Length and Breath Hole–WidthThe length and width of the of the breath hole, if the instrument has one (the mouth end of some flutes is simply open directly to the slow air chamber). There are many possible configurations for the breath hole, and these two dimensions provide only a minimal description of the breath hole. The configuration of the breath hole plays a key role in controlling the amount of breath pressure (also called “back-pressure” or “intraoral pressure”) that the player experiences. My personal belief is that less experienced players are better served with a smaller breath hole which produces a moderate amount of back-pressure, while more experienced players prefer a larger breath hole configuration which gives more direct control over the air pressure in the flue. There are a number of other dimensions on this page that affect breath pressure. Russ Wolf recommends a 5⁄16″ diameter breath hole 2 3⁄4″ long for a mid-range G minor flute (G4) with a 3⁄4″ bore ([Wolf 2001], page 10). Joe Nulph commented in the Native American Flute Making Forum on Facebook on February 15, 2016: In the majority of the flutes I create the diameter of the blow hole / embouchure is 5⁄16″. I use a router that has the capability to use router bits with a 1⁄2″ shank. This router is mounted onto the router table. For each flute I create the router table fence remains in the same location when I change router bits as I create the blow hole, the Slow Air Chamber and/or the bore. This method insures all portions of the flute end up being accurately aligned with each other from the North end of the flute to the South end of the flute. I draw precisely located #5 thin lead pencil lay out lines on the router table fence that align with the outer edges in-feed side & out-feed sides of the round nose router bit. I also lightly draw precisely located #5 thin lead pencil lay out lines on all 4 sides of each flute blank half. These layout lines show me where each portion of the flute starts & ends. The interior layout line help to confirm the router out portions in each of the two flute blank halves are going to or are not going to precisely align with each other. SAC–Length and SAC–WidthThe length and width of the slow air chamber, if the instrument has one. Russ Wolf recommends a 4″ long slow air chamber for a mid-range G minor (G4) flute with a 3⁄4″ bore ([Wolf 2001], page 10). Vance Pennington (Waking Spirit) provided a detailed opinion on this issue (Yahoo/NFW, #16,253, August 24, 2004): Slow Air Chambers are ideally as large as possible. I create all of my mid-range flutes with a 5 inch long SAC by whatever the bore is I am using for the flute. As another member of this group has stated, some makers create their flutes with a SAC at a length that makes the flute look good as, after all, the length of the SAC will determine where the bridge is situated. A flute with a SAC that is really long will result in a flute that looks as though the block is in the middle of the flute. It probably will play well but it sure doesn't look too good! Sound Chamber–LengthThe physical length of the sound chamber, from the upper most portion (including any backset – see below for this dimension) to the physical end of the sound chamber. Also called the “Bore Length” or simply “L”. Be aware that this dimension may have little to do with the acoustic length of the sound chamber, especially if the flute has direction holes or ornaments such as a carved bird head are present on the end of the flute. The Sound Chamber–Length is the primary dimension that controls the pitch of the lowest note on the instrument —
Sound Chamber–DiameterThe inside diameter of the sound chamber at a given location along the length of the sound chamber. In the most common configuration for Native American flutes — a cylindrical bore shape for the sound chamber — this single dimension captures all the information needed. In flutes where the sound chamber has a taper (called “conicity” in [Lefebvre 2012]) or flare, multiple measurements are needed at different sound chamber locations to represent the shape of the bore. Additionally, if the bore shape is oval, square, or some other shape, multiple measurements are needed at each location. However, it typically suffices in these situations to use the cross-sectional area of the sound chamber at each location. Also called the “Bore Diameter”, “Inside Diameter” (“I. D.”), or simply “D”. See these Flutopedia pages for extended discussions of this dimension: Sound Chamber–Aspect RatioThe ratio between the Sound Chamber–Length and the Sound Chamber–Diameter has a dramatic effect on the playing characteristics of the flute. This ratio is often referred to simply as “L:D”. The ratio of the length to the diameter of the sound chamber has a dramatic effect on the playing characteristics of any wind instrument. Flute makers typically call the diameter of the bore (which forms the sound chamber) “D”. The length of the sound chamber that is called “L”. However, this length is really the acoustic length of the sound chamber — a number close to, but not exactly, the physical length of the sound chamber. (For more on acoustic length, see Acoustic Length of a Flute.) The ratio L:D is called the sound chamber aspect ratio of the flute. For example: 18.6:1 is a typical ratio. It is often expressed as a single number by calculating L/D … for example: 18.6. Native American flutes tend to have lower sound chamber aspect ratios (i.e. fatter sound chambers for their length) than other wind instrument designs … typically in the range of 12 to 22. A sound chamber aspect ratio of 18 is typically quoted as a good starting point in for novice flute makers. In contrast, the Western concert flute has a sound chamber aspect ratio of about 38 and the fujara, an ethnic wind instrument from Slovakia, typically has a sound chamber aspect ratio of about 55. Generally speaking, here are some effects of the sound chamber aspect ratio:
Wall ThicknessThe thickness of the wall of the sound chamber at a given location along the length of the sound chamber. These measurements are particularly important at the location of any opening in the sound chamber — the finger holes and any direction holes. In the most common configuration for Native American flutes — a cylindrical bore shape for the sound chamber — the wall thickness is the same at all these sound chamber openings. Outside DiameterThe outside diameter of the sound chamber at a given location along the length of the sound chamber. In the most common configuration for Native American flutes — a cylindrical bore shape for the sound chamber — this single dimension captures all the information needed. In flutes that have a taper or flare in their sound chamber, the outside diameter might follow that inside diameter, or the outside diameter might be independent of the shape of the sound chamber. In particular, recorders are often manufactured with highly ornamented outside shapes to their bore. Often abbreviated “O. D.”. Finger Hole DistancesThe longitudinal location of the center of a given finger hole (or direction hole) in relation to the sound chamber. The location is often called the “station” of the finger hole. The location may be given as a distance from some fixed point on the sound chamber such as:
… or it might be given in relation to a calculated acoustic length of the sound chamber. Alternately, the station could be given in terms of a percentage of the distance between two fixed point along the sound chamber on either side of that finger hole, typically the head and foot ends of the sound chamber. See the Locating the Finger Holes section of the Crafting FAQ for an extended discussion of this dimension. Many Dimensions of the NAF
Recommendations for a number of key dimensions in the nest area are provided in Michael Prairie's Many Dimensions of the NAF document. This appeared as a JPG image file on Yahoo/NFW, originally dated October 3, 2003 (that image file has no author or date). Click on the image above for larger / higher resolution version of the updated image, as of March 18, 2018. Nest Dimensions
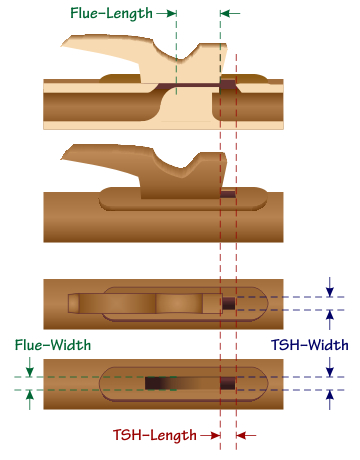
Flue–LengthThe total length of the flue, from the point at which any smooth transition or ramp from the slow air chamber ends to the beginning of the sound hole. Mike Prairie recommends a flue length of twice the Flue–Width (“Many Dimensions of the NAF” published by Mike Prairie on August 11, 2005 as NAF Sound Mechanism Dimensions.jpg in Yahoo/NFW). A shorter flue tends to reduce the tendency to water out (John Suttles (aka Ozark Guru), Yahoo/NFW, #56,557, June 19, 2014; Mike Jones, Yahoo/NFW, #55,772, October 1, 2013). Here is an image of a flute design with what appears to be a very short Flue–Length. It is also interesting because it appears to have a Flue–Width that widens gradually from the flue and across the sound hole and upper bevel:
Regarding the construction of “‘Low-Tech’ Whistles”,
Guido Gonzato notes that a shorter flue
“makes for a highly responsive whistle, but consumes slightly more air”
while a longer flue
“provides some back-pressure and needs less air, but makes the whistle less responsive”
([Gonzato 2015] Back-pressure tends to increase as the flue is made longer, in order to overcome losses due to increased friction when fluids (such as air) flow through longer channels. Flue–WidthThe width of the flue. This dimension matches the TSH–Width on many flutes. The predominant recommendation as a starting point for the width of the flue in discussions on the Yahoo/NFW and Yahoo/BNAFM newsgroups is ½ the Sound Chamber–Diameter. See, for example, Joe Nulph, Yahoo/BNAFM, #18,004, July 29, 2013. This recommendation is also made in [Stanford 2008], page 14, and Mike Prairie's “Many Dimensions of the NAF” document cited above). For example, if the Sound Chamber–Diameter is 3⁄4″ (typical for flutes with fundamental notes of G4, G#4, and A4), then the recommended sound hole and flue width is 3⁄8″. Edward Kort (Yahoo/NFW, #56,009, December 23, 2014) prefers a wider sound hole and flue. He typically sets the width of his sound hole and flue in the range of 62–67% of the Sound Chamber–Diameter. Regarding the construction of “Low–Tech Whistles”,
Guido Gonzato notes that a wider flue
“makes the whistle louder, the sound becomes a bit breathy, and more air is needed”
while a narrower flue
“makes the whistle quiet, the sound becomes sweet and clear, and less air is used”
([Gonzato 2015] See the section on TSH–Width below for additional discussion. Native American flutes often have a flue of uniform width along their entire length of the flue. However, some other styles of flutes may use various configurations of tapered flues — see the Flue Profile section below. TSH–LengthThe total length of the sound hole, from the exit of the flue to the splitting edge. The most common configuration for the sound hole in Native American flutes is rectangular … if another shape is used (such as circular or oval), then a different measurement strategy is needed. From Mike Prairie's “Many Dimensions of the NAF” document cited above: The length of the TSH is variable, but generally falls between about 3⁄16″ and 7⁄32″. A longer TSH will sound more airy, and a shorter one will tend to be weak. The key is to start small and sneak up on the final dimension based on what sounds good. The predominant recommendation as a starting point for the length of the sound hole (measured along the long axis of the flute) in discussions on the Yahoo/NFW and Yahoo/BNAFM newsgroups is 7⁄32″ for a mid-range flute. This recommendation is also made in [Stanford 2008], page 28 as well as in [Price 2010] The sound mechanism is the most critical part of any flute. I use small rasps and small files to properly configure the channel, the true sound hole, and the splitting edge. The channel must be such as to allow smooth airflow (very little turbulence). The dimension of the true sound hole that is parallel to the length of the flute body is extremely important, and with most sound mechanisms should be precisely 7⁄32 inch. If this dimension is exceeded, the flute begins to lose its clear sound (begins to become breathy). If this dimension is reduced, the flute begins to lose volume of sound and sometimes suffers from “nodal interference” …. If one wants to have a breathy sound from a flute, there are many ways to set a flute to make it so, but there is no way to set a breathy flute to make it clear sounding. It is best to start with the clear sound when the flute is being created. However, Mike Prairie (Yahoo/NFW, #56,324, March 24, 2014) notes that: The optimum TSH (sound hole) length and flue depth will vary with the key of the flute, among other things. I wouldn't expect a high D flute to have a TSH as long as 7/32, nor would I expect a bass A to have one so short. Regarding the construction of “‘Low-Tech’ Whistles”,
Guido Gonzato notes that a shorter sound hole
“makes notes in the second octave easier to play, while making first octave notes softer”
while a longer sound hole
“makes notes in the first octave more solid, but notes in the second octave need some push”
([Gonzato 2015] See the sections TSH–Length vs. Flue–Depth and Recorder Measurements below. TSH–WidthThe width of the sound hole. The most common configuration for the sound hole in Native American flutes is rectangular … if another shape is used (such as circular or oval), then a different measurement strategy is needed. From Mike Prairie's “Many Dimensions of the NAF” document cited above: The TSH width will affect the volume of the flute. Wider is louder. A good starting point is half the bore diameter. The TSH width also generally match the width of the flue exit. Increasing the width of the sound has a number of effects, based on newsgroups discussions with Michael Jones, Edward Kort, Daniel Bingamon, and Michael Prairie on March 28–29, 2016 (Yahoo/NFW, #55,919–55,926) :
Nest Detail
BacksetThe distance between the head-end of the sound chamber and the end of the flue. It can be thought of as an extension of the sound chamber North of the sound hole. Backset is also know as “backcut” and “headspace”. Increasing the backset (while keeping all other dimension the same) will lengthen the sound chamber and flatten all pitches,
but the effect will be much more pronounced on the higher pitches of the first register than the lower pitches.
On tests with a mid-range F minor Native American flute with a tapered bore (1″ to ¾″) and “large finger holes”,
the variation in tuning between no backset and a backset of ¾″was 20 cents for
From Mike Prairie's “Many Dimensions of the NAF” document cited above: The backset will affect the pitch of the second octave notes, and can also affect the timbre of the fundamental note. A zero or very small (< 1⁄8″ backset is a good starting point if a flat bore termination is used. For a rounded bore termination, about 1/3 the bore diameter North of the start of the radius is a good starting point. SAC Exit–Top Ramp AngleA measure of the angle from the upper ramp to the longitudinal plane of the slow air chamber. Russ Wolf recommends a 30° angle for this dimension for a mid-range G minor flute (G4) with a 3⁄4″ bore ([Wolf 2001], page 10). Flue–Depth
The distance between the top of the plug and the bottom of the block. This distance can be created by the shape of the nest area, or by use of a spacer plate (see the image to the right). From Mike Prairie's “Many Dimensions of the NAF” document cited above: The flue depth will greatly affect the flow of the air stream. A deeper flue will sound airy, and a shallow flue will sound weak and produce a lot of back-pressure. Generally, a wider flue will be more shallow. Start with a depth about 3⁄64″ or so, and make it progressively more shallow by sanding the roost on a flat surface, checking the sound often. Native American flutes often have a flue of uniform depth along their entire length (ignoring any leading ramp that transitions from the slow air chamber). However, some other styles of flutes may use various configurations of tapered flues — see the Flue Profile section below. TSH–Length vs. Flue–DepthThe ratio between these two dimensions has a dramatic effect on the voicing of the flute. From Mike Prairie (Yahoo/NFW, #56,324, March 24, 2014): What I have found to be “optimum” for me is based on the ratio of the TSH length to the flue depth; I tend to favor something around 6:1, while others tend toward 7:1 (a typical recorder has a 4:1 ratio). For a 7/32 TSH in a mid-range flute, I might have a flue that was about 0.035 (1.12/32) for a 6.25:1 ratio, while a 1/32-deep flue for the same TSH would be right on the 7:1 mark. Try different things and you might find that voice you're hunting — just be sure to be precise in crafting your sound mechanism since rough surfaces and non-symmetric shapes will cause more problems than you might expect. In a document titled “TSH Length vs. Flute Depth” published on January 1, 2007 in Yahoo/NFW, Mike Prairie expands on this idea and plots the theoretical ratio of these parameters for “maximum efficiency”: The theoretical ratio of air jet length (TSH) to jet thickness (flue depth) for maximum efficiency is approximately:
See also the column Snd Hole–Length vs. Flue–Depth@Exit in the table of the Recorder Measurements section below. Back-PressureThe back-pressure experienced by a player is affected by many elements of the design of the flute, in particular:
Here is a graph of the calculated amount of back-pressure contributed by the Flue–Depth dimension from
[Prairie 2011]
Real-world Native American flutes compare well with this theoretical model. If the average breath pressures I measured across the mid-range flutes in a sample of 71 Native American flutes ranged from 2.24 to 6.50 cm H2O on the above graph ([Goss 2013] This shows that reducing Flue–Depth below a certain point has a dramatic effect on back-pressure. Flue ProfileThanks to Edward Kort, Michael Prairie, Michael Jones, and Jon Norris, who provided extensive advice and assistance in the development of this section as well as the Flue–Taper section.
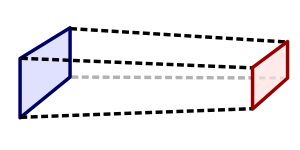
The flues of most Native American flutes are constructed with a consistent depth and width along the length of the flue (ignoring any leading ramp that transitions from the slow air chamber). This is the configuration of the flues shown above on this page. I call this style a uniform flue. However, some Native American flutes and many other styles of flute (recorders, Irish whistles, Fujaras, etc.) use a flue design than narrows in depth and/or width from the entrance point (where the air first enters the flue) to the exit point (at the sound hole). I call this style of flue a tapered flue. In the design of wind instruments, other names for this configuration I have seen are “tapered windway”, “focusing flue”, and “focusing channel”. In fluid dynamics, it is called a “tapered duct” — either a “nozzle” or a “diffuser”, depending on the direction of the taper. The diagram a the left demonstates a rather exaggerated tapering of the flue in both depth and width. The depth is narrowed both by the canting of the base of the block downard toward the sound hole and the rising / thickening of the plug towards the sound hole. (How a flute maker would actually achieve these adjustments in the workshop is beyond me). It is tempting to think of this air in the flue as being compressed as it proceeds down a tapered flue, but the effect is quite different. Since we are dealing with air a relatively low velocity (compared with the speed of sound), the air does no compress, it speeds up. This increase in speed actually lowers the air pressure, based on Bernoulli's principle. Flue–Taper RatioTo capture the dimensions of a tapered flue, I use a measure called the Flue–Taper Ratio. It uses the rectangular area (Flue–Depth × Flue–Width) at the entrance point compared with the rectangular area at the exit point of the flue. This can be visualized in this diagram by the blue rectangle getting constricted into the red rectangle:
The Flue–Taper Ratio is the percentage of the rectangular area at the entrance that is lost at the exit: Flue–Area = Flue–Depth × Flue–Width Flue–Taper Ratio = (Flue–Area@Entrance − Flue–Area@Exit) / Flue–Area@Entrance Note that if, for whatever reason, the dimensions of the flue are larger at the exit than at the entrance, the Flue–Taper Ratio will be negative, indicating a “reverse taper” or “flaring” of the flue. The Flue–Taper Ratios shown for the Baroque recorders in the Recorder Measurements section below range from 20% to 48%. Why would one use a tapered flue? According to Michael Jones (personal communication, December 4, 2015): The primary purpose of a focusing flue is to reduce turbulence by providing a more gradual change in both direction and speed of the air between the SAC and the exit of the flue. Turbulence is created any time air passes over or around a sharp edge or corner. Using a focusing flue can be part of the solution to smoothing out the entire sound mechanism. If you are able to smooth out and round off all the places that cause turbulence, you will induce less “edge effect noise” that typically sounds like “white noise” or a hissing sound. While the Flue–Taper Ratio can capture a gross measure of how much smaller the flue gets, there are several limitations:
Flue Profile StudiesTo explore the real-world effects of various flue profiles, Edward Kort carried out a number of studies, constructing hundreds of test flutes. This section reports the general results of those studies, from a personal communication he provided on December 4, 2015. I have made some stylistic edits to his report and added some [editors notes]: The major caveat to any of my conclusions is that the ultimate measures — tone quality and playing characteristics — are very personal, and thus will likely vary between makers.
Study 1. Flue–Width and Flue–Length. [These vary the parameters of a uniform flue shape, after any ramp at the exit of the slow air chamber.]
Study 2. Curved vertical flue profile.
Study 3. Circular profile with flat section before the flue exit.
Study 4. Straight flue profile, with varying depths at the flue exit and mouthpiece exit (the one-dimension compression test). General Conclusions: Compression, per se, does not contribute to better tone quality nor better playing characteristics; however, flue profile does. This matches what I have read about the flue profiles of high quality recorders. From Studies 2 and 3, I derived what I call my “Performer Series”. These flutes have a dramatically increased volume without impacting the clean tone that I prefer. However, they are too rich in the high harmonics for my taste, even after increasing the bore diameter to partially compensate. So I rarely make flutes in this series. Recorder MeasurementsCareful measurements of five sizes from a specific family of Baroque recorders crafted by the same maker were published in [Blanc 2010]. Here is a table of measurements, including conversions from the published metric units. The diameter of the sound chamber is taken at the sound hole:
Rake Angle
The shape of the face of the block has a substantial effect on the overall tuning and behavior of the flute. We provide measurements only for the common case of flat-faced block. Note that the angle that is measured is from the portion of the face of the block closest to the bottom of the block — i.e. nearest to the sound hole. The Rake Angle of the face of the block is shown in the diagram on the left. Positive rake angles — the block face “leaning forward” — tend to flatten the overall pitch of the flute while negative rake angles — the block face “leaning back” — tend to make the flute sharper. In addition to a flat-faced block, many flutes add wings that extend along the side of the sound hole to form a chimney. Adding these elements to the bird has dramatic effects on tuning and sound production. Measurement of wings and chimneys is beyond the scope of this page, but Mike Prairie notes that “A deep chimney will flatten the pitch and can make overblown notes a little harder to control”. A tall chimney is also a key element in creating a flute that produces a warble. Bevels on the Fipple
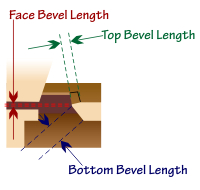
The configuration of the fipple mechanism is one of the the most important aspects that affects the sound of the flute. There are many configurations possible. I have chosen a fairly general design using three bevels, each with it's own length and angle from the longitudinal plane of the sound chamber. The Top Bevel is fairly short on most Native American flutes, while the Bottom Bevel is often longer (as shown in the prototype diagrams above). The Face Bevel is really a measure of the thickness of the actual splitting edge. If the Face Bevel is perpendicular to the long axis of the flute, then the Face Bevel Angle is 90°. In practice, it is often difficult to determine the exact dimensions of the Face Bevel, since the actual splitting edge is often not precisely flat, but “eased” or “rounded off” by the flute crafter. A sharper splitting edge corresponds to a smaller Face Bevel. Mike Prairie (in the “Many Dimensions of the NAF” document cited above) suggests that:
Russ Wolf recommends a 30° Bottom Bevel Angle and a 1⁄8″ Top Bevel Length for a mid-range G minor flute (G4) with a 3⁄4″ bore ([Wolf 2001], page 10). Other Types of FlutesFipple designs for other types of flutes can vary greatly from Native American flutes. Here are two diagrams from U. S. patents that show the fipple configurations for an ocarina and a recorder (with an adjustable flue). In these diagrams, I added coloration to make it easier to see the body of the flute. The first is from U.S. Patent 6,872,876 B2, which describes a type of ocarina
([Ahrens 2005]
… and here is an interesting design for a recorder-style sound mechanism from Figure 1 of U.S. Patent 5,107,740, which is titled “Flute Mouthpiece with Adjustable Core Gap”
([Strathmann 1992]
Splitting Edge Lift
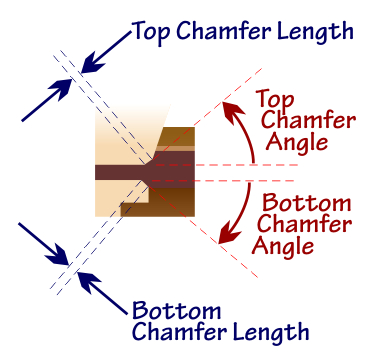
This dimension describes where the splitting edge sits vertically in the airstream exiting the flue. Specifically, this is a measure of how high the splitting edge (if it is completely “sharp”) or the edge between the Bottom Bevel and the Face Bevel is elevated above the plane extending from the floor of the flue. If you were able to cite down the flue, you would see the splitting edge or the Face Bevel positioned at some location vertically in your view. The Lift dimension could be given as a measurement, or as a percentage of the height of the flue. Mike Prairie (in the “Many Dimensions of the NAF” document cited above) suggests that a Lift of about 1⁄128″ is typical. If the Flue–Depth of a given flute were 4⁄128″, the Lift would be 25%. ChamfersA chamfer is an edge that is created between two adjoining faces that would otherwise form a sharper angle. A common situation is a 90° edge created by two faces that is chamfered to create two 45° edges.
Mike Prairie (in the “Many Dimensions of the NAF” document cited above) suggests that: The flue exit may be chamfered slightly (about 20–30°, approximately 1⁄32″ or less from the lip) to ease the sharp transition into the TSH. This can reduce turbulence and move the air stream lower at the cutting edge. If you put a chamfer here, keep in mind that the cutting edge height may need to be adjusted lower, and the optimum length of the TSH may be a little shorter. A similar chamfer can be used in the bird. Since the position of the bird is adjustable, the length of the chamfer is not as critical and can be made larger.
| |||||||||||||||||||||||||||||||||||||||||||||||||||||||||||||||||||||||||||||||||||||||||||||||||||||||||||||||||||||||||||||||||||||||||||||||||||||||||||||||||||||||||||||||||||||||||||||||||||||
|
To cite this page on Wikipedia: <ref name="Goss_2022_dimensions"> {{cite web |last=Goss |first=Clint |title=Flute Crafting Dimensions |url=http://www.Flutopedia.com/dimensions.htm |date=7 June 2022 |website=Flutopedia |access-date=<YOUR RETRIEVAL DATE> }}</ref> |
